Showing posts with label C#. Show all posts

Wednesday, July 15, 2020

xUnit Tests Not Running in Visual Studio IDE

You may have encountered that Test projects are not running or not showing in the Test Explore pane in visual studio. I also have faced similar issue while creating a new xUnit Test Project for my application. Here are the changes I did to solve the issue. Once installed the following packages, I was able to run the tests in test explore as expected.

  • Microsoft.NET.Test.Sdk
  • Microsoft.TestPlatform.TestHost
  • xunit.runner.visualstudio
  • xunit

Sunday, July 5, 2020

How to KILL running excel processes in C#

While working with Excel files, you enconter multiple instance of excel processes are running in background(can be seen in Task Manger Processes). This will cause issues when trying to create and manupulate excel files in another program. Therefore, before working(reading/writing) with any excel objects, as a practice clean up the existing/running excel instances.
var processes = from p in Process.GetProcessesByName("EXCEL") select p;
            
foreach (var process in processes)
{
	process.Kill();
}

Friday, January 25, 2019

How to remove the paragraph tag from rich text editor in Umbraco (Razor)

When you publish contents in Umbraco site, you may have noticed leading paragraph tag and tailing paragraph tags are wrapped the content. By default, RichText editor wraps the content as you can see in following sample.

This is a known issue/feature ;) and most of the time developers have to manually remove those two tags to render the raw content properly.
You may write a custom logic to remove the tags. Let's have a look on few workarounds.

  • You can use in-build Umbraco function.
<div class="card-body">
  <h2 class="card-title">@item.Title</h2>
  <p class="card-text">@umbraco.library.RemoveFirstParagraphTag(item.Content)</p>
  <a href="@item.PostUrl" class="btn btn-primary">Read More &rarr;</a>
</div>

  • Custom implementation(you may do addition null or length checking before trim)
@{
  var bodyContent = Model.Content;
  bodyContent = bodyContent.Trim();
  bodyContent = bodyContent.Substring(3);
  bodyContent = bodyContent.Substring(0, bodyContent.length - 4);
}

Thursday, January 24, 2019

Create Blog home page content in Umbraco CMS

You must have already followed previous articles to continue as below instructions. In case if you have jumped to this article, you may follow below article first and prepare your solution to continue along with the code snippets. You can view a static content of blog home page in startbootstrap-blog-home.

  1. Getting started with Umbraco CMS 7+
  2. Install Umbraco on Localhost and Build Visual Studio Solution
  3. Create a Master Template(layout) in Umbraco CMS part 1
  4. Create a Master Template(layout) in Umbraco CMS part 2
Create a HomeController and Create a partial view with following Model.

using System;
namespace UmbracoDemoApp.Models
{
    public class PostSummaryModel
    {
        public PostSummaryModel(string imageUrl, string title, string postedBy, DateTime postedOn, string content)
        {
            ImageUrl = imageUrl;
            Title = title;
            PostedBy = postedBy;
            PostedOn = postedOn;
            Content = content;
        }

        public string ImageUrl { get;  }
        public string Title { get;  }
        public string PostedBy { get; }
        public DateTime PostedOn { get; }
        public string Content { get; }
    }
}
Your home controller should look like this. Following code will iterate all the blog posts under home tab. We will create placeholders in a while in umbraco portal.
 public class HomeController : SurfaceController
    {
        private const string VIEW_PATH = "~/Views/Home/{0}";
        public ActionResult RenderPostsSummaries()
        {
            var list = new List<PostSummaryModel>();
            IPublishedContent blogPage = CurrentPage.AncestorOrSelf(1).DescendantsOrSelf().Where(x => x.DocumentTypeAlias == "home").FirstOrDefault();

            foreach (IPublishedContent item in blogPage.Children)
            {
                string title = item.GetPropertyValue<string>("postTitle");
                string imgUrl = Umbraco.Media(item.GetPropertyValue<string>("primaryImageUrl"));
                string content = item.GetPropertyValue<string>("PostContent");
                if (!string.IsNullOrEmpty(content))
                {
                    if (content.Length > 200)
                        content = content.Substring(0, 200);
                }
                else
                    content = string.Empty;

                if (string.IsNullOrEmpty(imgUrl))
                    imgUrl = "http://placehold.it/750x300"; // custom image

                list.Add(new PostSummaryModel(item.Url, imgUrl, title, item.CreatorName, item.CreateDate, content));
            }
            return PartialView(string.Format(VIEW_PATH, "_postsSummary.cshtml"), list);
        }
    }
As you have already noticed, I have used a _postsSummary.cshtml partial view to render post summaries. Create a partial view and paste the following code to read the posts from the Db.

@using UmbracoDemoApp.Models
@model List<UmbracoDemoApp.Models.PostSummaryModel>
<div>
    @if (Model.Count == 0)
    {
        <div style="height:100px;" class="justify-content-center">No posts to display</div>
    }
    else
    {
        foreach (PostSummaryModel b in Model)
        {
            @RenderPostSummaryView(b);
        }
    }
</div>

@helper  RenderPostSummaryView(PostSummaryModel item)
{
    <!-- Blog Post -->
    <div class="card mb-4">
        <img class="card-img-top" src="@item.ImageUrl" alt="Card image cap">
        <div class="card-body">
            <h2 class="card-title">@item.Title</h2>
            <p class="card-text">@item.Content</p>
            <a href="@item.PostUrl" class="btn btn-primary">Read More &rarr;</a>
        </div>
        <div class="card-footer text-muted">
            @item.PostedOn
            <a href="#">@item.PostedBy</a>
        </div>
    </div>
}
As the last step update Home.cshtml page with following line of code. It will read the post summaries and render inside the page body.
@inherits Umbraco.Web.Mvc.UmbracoTemplatePage
@{
    Layout = "Master.cshtml";
}

@{ Html.RenderAction("RenderPostsSummaries", "Home");}

We are almost done with the C# coding in Visual studio project. Next is to create place holders in home page and create couple of blog posts to show in home page.

Login to http://localhost/UmbracoDemoApp/umbraco,

go to Templates--> Master--> Create BlogHome then
go to settings --> Document Types --> Home--> Permissions --> Allow as root and add BlogHome as a Child.

Add 3 tabs for Page Title, Primary Image and for the content of BlogHome page. Make sure you name the control as you specified in the code. title, primaryImageUrl, and postContent then save.When you add controls, add reuse component tab to add a textString for title, Media Picker for image and Rich TextEditor for post content.

Now you can create blog posts under content tab. Navigate to the content tab --> Create --> BlogHome as the template --> Fill the content --> save and publish.


Thursday, September 5, 2013

Create your first WCF 4.0 application in C#

This is the initial step that i'm gonna describe you as the first step, as well as just to give a small idea of how to create a simple WCF service application. Let work through the code snippet that i have provided here. 

Step 01 : Create New WCF Class Library

Open VS 2010 -> File -> New -> Project -> WCF Class Library -> Name it as PersonServiceLibrary. By default it will create Service.cs and IService.cs files. Just delete those two. Will create the service from the sketch.

Step 02 : Add a new Class "Person" & add following fields.

Add using System.Runtime.Serialization namespace to the file.
namespace PersonServiceLibrary
{
    [DataContract]
    public class Person
    {
        [DataMember]
        public string PersonID;
        [DataMember]
        public string FirstName;
        [DataMember]
        public string LastName;
        [DataMember]
        public string Address;
        [DataMember]
        public bool Status;
        [DataMember]
        public DateTime CreatedDate;
    }
}

Step 03 : Add an Interface "IPersonService"
This is to add the service methods of the Person. Add following codes snippets to the IPersonService Interface.

namespace PersonServiceLibrary
{
    [ServiceContract]
    public interface IPersonService
    {
        [OperationContract]
        void AddPerson(Person person);
        
        [OperationContract]
        List<Person> GetAll();

        [OperationContract]
        void RemovePerson(string personID);
    }
}
Step 04 : Add another Class "PersonService"
Implement IPersonService in PersonService Class & add following snippets init.
namespace PersonServiceLibrary
{
    [ServiceBehavior(InstanceContextMode = InstanceContextMode.Single)]
    public class PersonService : IPersonService
    {
        List<Person> personList = new List<Person>();

        public void AddPerson(Person person)
        {
            person.PersonID = Guid.NewGuid().ToString();
            personList.Add(person);
        }
        public List<Person> GetAll()
        {
            return personList;
        }
        public void RemovePerson(string personID)
        {
            personList.Remove(personList.Find(e => e.PersonID.Equals(personID)));
        }
    }
}

Step 05 : Edit WCF Configuration 
Now Right-Click on App.config & click Edit WCF Configuration. AS shown in attached image, set the Name to PersonServiceLibrary.PersonService.

Now Expand the EndPoints & click and change the contract into PersonServiceLibrary.IPersonService

Step : 06 Run the Application
Press F5 to run the program. It will open a WCF Test Client which displays exposed service methods. Double Click "AddPerson " method and enter some values. Press "Invoke" button to display the results. Like wise check all three methods. We are done with first application in WCF.

Download

Wednesday, September 4, 2013

How to validate DataGridView column to allow only numbers in c#

I'll use a windows application form to demonstrate this. Let say you have a datagridview which has to prevent entering Non -numerical values in the particular columns. I'm using Cost and SellingPrice Columns to demonstrate the validation. (Do Not worry about attached image dataset. Just follow the code snippet on validation )

You have to use CellValidating event to tackle this.


Follow the below code snippet for the validation;
private void dataGridViewDistribution_CellValidating(object sender, 
DataGridViewCellValidatingEventArgs e)
{
    DataGridViewColumn col = dataGridViewDistribution.Columns[e.ColumnIndex] as DataGridViewColumn;

    if (col.Name.ToLower() == "cost" || col.Name.ToLower() == "sellingprice")
    {
        DataGridViewTextBoxCell cell = dataGridViewDistribution[e.ColumnIndex, e.RowIndex] as DataGridViewTextBoxCell;
        if (cell != null)
        {
            char[] chars = e.FormattedValue.ToString().ToCharArray();
            foreach (char c in chars)
            {
                if (char.IsDigit(c) == false)
                {
                    MessageBox.Show("You have to enter digits only");
                    e.Cancel = true;
                    break;
                }
            }
        }
    }
}

Wednesday, August 21, 2013

Add a Repeater inside a GridView in ASP.NET and implement Expand/Collapse rows in GridView using javascript/jQuery

This article will explain how to add a repeater inside a grid view. This will help you to display well organized data to the end users. Also it is good if we can allow user to expand/ collapse records at once or once by one. If there are lot of records exists in the record set, always better to display in this way. For this example i'm using Adventure works database ProductCategory & ProductSubCategory Tables to demonstrate this topic. Hope this will help someones' life easy :). You can download the sample code snippet end of this article.

Create the following markup in your application. And add jQuery library (i'm using both java-script and jQuery to do this. But if you like just go with jQuery either java-scripts). I use this example just to give you the idea behind the topic.


<div id="divWrapper">
<div>
    <table>
        <tr>
            <td style="width: 15px; padding-left: 2px;">
                <a href="JavaScript:ExpandCollapseAll();" id="div_0">
                    <img id="imgdiv_0" width="9" border="0" src='<%= ResolveClientUrl("~/images/ig_treeMsdn_plus.gif") %>' />
            </td>
            <td style="font-weight: bold; font-size: 16px;">
                View Product Categories & sub categories
            </td>
        </tr>
    </table>
</div>
<div>
    <asp:GridView ID="gvProductsCategory" runat="server" AutoGenerateColumns="false" GridLines="Both" ShowHeader="false"
        ShowFooter="false" Width="100%">
        <RowStyle BackColor="#A0EFFA" ForeColor="#333333" />
        <AlternatingRowStyle BackColor="White" ForeColor="#284775" />
        <EmptyDataTemplate>
            No Products were found!
        </EmptyDataTemplate>
        <Columns>
            <asp:TemplateField>
                <ItemTemplate>
                    <table style="width: 100%;" class="removeCellPaddingsAll">
                        <tr>
                            <td style="width: 20px; height: 25px;">
                                <a href="JavaScript:ExpandCollapseDiv('div_<%# Eval("ProductCategoryID") %>');">
                                    <img id='imgdiv_<%# Eval("ProductCategoryID") %>' width="9" border="0" src='<%= ResolveClientUrl("~/images/ig_treeMsdn_plus.gif") %>'
                                        class="CollapseExpandIMGClass" />
                            </td>
                            <td style="width: 130px;">
                                <%#Eval("Name")%>
                            </td>
                            <td>
                                <%# Eval("rowguid")%>
                            </td>
                        </tr>
                        <tr>
                            <td colspan="3">
                                <div id='div_<%# Eval("ProductCategoryID") %>' style="display: none; border-top: 1px solid darkgray;"
                                    class="CollapseExpandDIVClass">
                                    <asp:Repeater ID="rptProductSubCategory" runat="server" DataSource='<%# DataBinder.Eval(Container, "DataItem.InnerVal") %>'>
                                        <HeaderTemplate>
                                            <table style="width: 100%;">
                                        </HeaderTemplate>
                                        <ItemTemplate>
                                            <tr>
                                                <td style="width: 30px; height: 25px;" />
                                                <td style="width: 120px;">
                                                    <%#Eval("Name") %>
                                                </td>
                                                <td>
                                                    <%#Eval("ModifiedDate")%>
                                                </td>
                                            </tr>
                                        </ItemTemplate>
                                        <FooterTemplate>
                                            </table>
                                        </FooterTemplate>
                                    </asp:Repeater>
                                </div>
                            </td>
                        </tr>
                    </table>
                </ItemTemplate>
            </asp:TemplateField>
        </Columns>
    </asp:GridView>
</div>
</div>

Following code snippet for expand/ collapse gridview rows using javascipts. Add this scripts to head tag in the page.

<head runat="server">
    <title></title>
    <script src="Scripts/jquery-1.4.1.min.js" type="text/javascript"></script>
    <script src="Scripts/jquery-1.4.1-vsdoc.js" type="text/javascript"></script>
    <script type="text/javascript">
        var expanded = false;
        var collapseImage = '<%= ResolveClientUrl("~/images/ig_treeMsdn_plus.gif")%>';
        var expandImage = '<%= ResolveClientUrl("~/images/ig_treeMsdn_minus.gif")%>';

        function ExpandCollapseDiv(divname) {
            var div = document.getElementById(divname);
            var img = document.getElementById('img' + divname);

            if (div.style.display == "none") {
                div.style.display = "block";
                img.src = expandImage;
                expanded = true;
            } else {
                div.style.display = "none";
                img.src = collapseImage;
                expanded = false;
            }

            $(".CollapseExpandDIVClass").each(function (index) {
                console.log(index + ": " + $(this).text());
                console.log($(this).css("display") == "block");
                if ($(this).css("display") == "block") {
                    expanded = true;
                }
            });


            if (expanded) {
                $('#imgdiv_0').attr("src", expandImage);
            }
            else {
                $('#imgdiv_0').attr("src", collapseImage);
            }

        }
        function ExpandCollapseAll() {
            if (expanded) {
                $('.CollapseExpandDIVClass').css("display", "none");
                $('.CollapseExpandIMGClass').attr('src', collapseImage);
                $('#imgdiv_0').attr('src', collapseImage);
                expanded = false;
            }
            else {
                $('.CollapseExpandDIVClass').css("display", "block");
                $('.CollapseExpandIMGClass').attr('src', expandImage);
                $('#imgdiv_0').attr('src', expandImage);
                expanded = true;
            }
        }
    </script>
</head>

The C# code,
 protected void Page_Load(object sender, EventArgs e)
        {
            DataSet _dsProducts = new DataSet();
            // create connection string
            using (SqlConnection _con = new SqlConnection(@"Data Source=ARUNA\MSSQLSERVER1;Initial Catalog=AdventureWorks2008R2;Integrated Security=True"))
            {
                using (SqlCommand _cmd = new SqlCommand())
                {
                    _cmd.CommandText = "sp_GetProducts";
                    _cmd.CommandType = System.Data.CommandType.StoredProcedure;
                    _cmd.Connection = _con;
                    SqlDataAdapter _adapter = new SqlDataAdapter(_cmd);

                    if (_con.State != ConnectionState.Open)
                        _con.Open();
                    _adapter.Fill(_dsProducts); // this will fill _dsProducts with two tables

                    // this will map the dataset into two tables which returns from sp
                    _dsProducts.Tables["Table"].TableName = "ProductCategory";
                    _dsProducts.Tables["Table1"].TableName = "ProductSubcategory";
                }
            }

            // lets create the relation with two tables
            _dsProducts.Relations.Add(
                        "InnerVal",
                        _dsProducts.Tables["ProductCategory"].Columns["ProductCategoryID"],
                        _dsProducts.Tables["ProductSubcategory"].Columns["ProductCategoryID"]);

            gvProductsCategory.DataSource = _dsProducts.Tables["ProductCategory"];
            gvProductsCategory.DataBind();
        }

Following SP is to get some dummy records for demonstration purposes using AdventureWorks2008R2 database.

USE AdventureWorks2008R2
-- =============================================
-- Author      : Aruna Perera (anishantha87.blogspot.com)
-- Create date : 2013-08-21
-- Description : Returns Product category & sub category
-- =============================================
CREATE PROCEDURE sp_GetProducts
 
AS
BEGIN

 SET NOCOUNT ON;

 SELECT TOP 4 [ProductCategoryID],
  [Name],
  [rowguid]
 FROM   [AdventureWorks2008R2].[Production].[ProductCategory]

 SELECT TOP 40 [ProductSubcategoryID],
  [ProductCategoryID],
  [Name],
  [ModifiedDate]
 FROM   [AdventureWorks2008R2].[Production].[ProductSubcategory] 

END
GO

Sample output
Download

Tuesday, July 23, 2013

Create Yes/No/Cancel buttons in MessageBox Windows Application

This code snippets will elaborate handling MessageBox Yes/No/Cancel button in Windows Application using C#. Follow below steps to create a small application to do this by yourself else download the attachment for the sample application with visual studio 2010.

1.) Create a Windows Application and give it a preferred name.
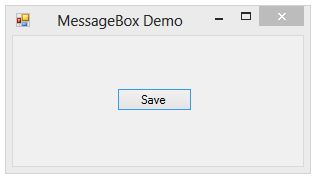
2.) Add a form to the solution and add a Button as displayed below image.

3.) Now double click the button and add following code snippet as displayed below.
private void btnSave_Click(object sender, EventArgs e)
{
  // get the result 
  DialogResult result = MessageBox.Show("Hi, do you want to test messagebox buttons?",
  "MessageBox Buttons Demo", MessageBoxButtons.YesNoCancel, MessageBoxIcon.Information);
 if (result == DialogResult.Yes)
 {
    // if user clicked 'Yes' button
 }
 else if (result == DialogResult.No)
 {
   // if user clicked 'No' button
 }
 else
 {
   // if user clicked 'Cancel' button
 }
}

4.) Now press the "Save" button which shows below messagebox. You can changed the MesageBoxIcon either MessageBoxIcon.Exclamation,MessageBoxIcon.Asterisk.


5.) Based on the result Yes/No or Cancel modify your code to manage your application.

Download