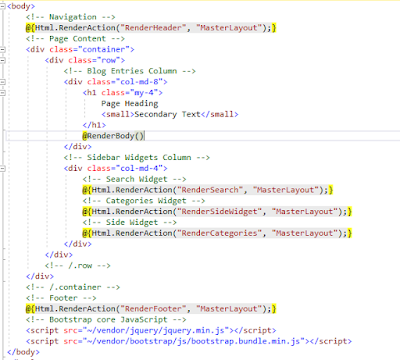
In this post we will separate header, footer, sidebar and other widgets into partial views using visual studio.
In the startbootstrap home template, we can separate out following areas into partial views.
- Search Widget
- Categories Widget
- Side widget
- Header
- Footer
MasterLayoutController has been extended with SurfaceController.using System.Web.Mvc;
using Umbraco.Web.Mvc;
namespace UmbracoDemoApp.Controllers
{
public class MasterLayoutController : SurfaceController
{
private const string VIEW_PATHS = "~/Views/MasterLayout/{0}";
public ActionResult RenderHeader() => PartialView(string.Format(VIEW_PATHS, "_header.cshtml"));
public ActionResult RenderFooter() => PartialView(string.Format(VIEW_PATHS, "_footer.cshtml"));
public ActionResult RenderSearch() => PartialView(string.Format(VIEW_PATHS, "_search.cshtml"));
public ActionResult RenderCategories() => PartialView(string.Format(VIEW_PATHS, "_categories.cshtml"));
public ActionResult RenderSideWidget() => PartialView(string.Format(VIEW_PATHS, "_sidewidget.cshtml"));
}
}
Next is to move the related html code snippets from master template to relevant partial views. If you have correctly moved the HTML code, your Master.cshtml page should look like this.
We have completed the master page layout with partial views. Next is to create the blog post partial view in Home page.

No comments:
Post a Comment