You can use database projects to create new databases, new data-tier applications (DACs), and to update existing databases and data-tier applications by database Project templates in visual studio. This will enable the development team to manage databases changes and database servers by creating a DAC project, database project, or a server project via version control. Team Members can check out files to do changes, build, create and test changes in an isolated development environment, or sandbox, before check in to the version control for sharing them with the team. Once the team finishes and test all changes for a particular release of the database in a staging environment, Database Administrator can deploy the changes into production server.
Note: The database projects can be created in Visual Studio Premium & Ultimate versions only.
Note: The database projects can be created in Visual Studio Premium & Ultimate versions only.
Create a database project with VS 2012
In this example, I will use the AdventureWorks2008R2 database to create, manage, and deploy changes to LocalDB database. Following steps will ensure you to create database project successfully.
Step 01 : Setup SQL Server database Tools
Install latest database tools for Visual Studio 2012. Once its done, you can see SQL Server Object Explorer under View menu then click on it. It will display SQL Server Instances and a folder called Projects. Click Here to download Visual Studio 2012 Data Tools.
Step 02 : Connect to the SQL Server instanaces
Right-Click on SQL Server –> Add SQL Server( connect via windows/server authentication) –> Expand the connected instance –> Right Click on AdventureWorks2008R2 –> Create New Project
Step 03 : Create database project using AdventureWorks2008R2 Database
- Connected instance (schema will be created based on this)
- Database project name
- Project Path
- If this is checked, Unchecked this option (add to the version control once the after you build the project)
- This will create sub folders for the db schema based on this(recommended 2-1000) eg: If you have 2000+ SPs, this will create proc1, proc2 ..etc. Then Click “Start”. This will create database schema project.
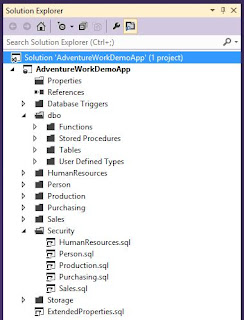
Note: Based on the database schema, it will organize the project folders, sub folders as follows;
Security folder contains the connected database's login users, roles..etc.
You may remove this folder from the the project solution since most of the time the production database has different user logins and roles we might not deploy the user logins that are using in development environment. But this may changed based on the project.
You may remove this folder from the the project solution since most of the time the production database has different user logins and roles we might not deploy the user logins that are using in development environment. But this may changed based on the project.
Step 04 - Configure database project
- Right-Click on the Project –> Properties –> this will show the database project configuration window.
- Go to –> Project Settings tab –> Select the target platform: either Sql Server 2005/2008/2012
- Go to –> Debug tab –> target connection string (default it will set to LocalDB). If you do not planned to create database schema into local, change it to eg: perseus/CropDBDev database. For more information about LocalDB click here.


No comments:
Post a Comment