Sunday, October 22, 2023

How to Publish DOT NET MVC Applications Using MSBuild.exe

In this post, you will find two ways to publish project artifact using MsBuild.exe. 

In this example solution (Visual Studio Community 2019 Version), I have created 2 Projects with MVC Application and an API project. 

 Note: Both Projects are created on .NET framework 4.8, However, I have tested with .NET Core 6.0 Projects created using Visual Studio Professional/Community versions successfully. 


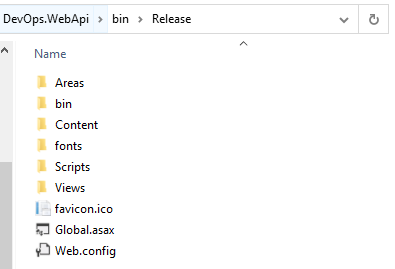
Here is my Project Structure for the demo.


Option 1 - Create a publish profile for the project. DevOpsProfile.pubxml

<project>
  <propertygroup>
    <deleteexistingfiles>True</deleteexistingfiles>
    <excludeapp_data>False</excludeapp_data>
    <launchsiteafterpublish>True</launchsiteafterpublish>
    <lastusedbuildconfiguration>Release</lastusedbuildconfiguration>
    <lastusedplatform>Any CPU</lastusedplatform>
    <publishprovider>FileSystem</publishprovider>
    <publishurl>bin\Release</publishurl>
    <webpublishmethod>FileSystem</webpublishmethod>
    <siteurltolaunchafterpublish>
  </siteurltolaunchafterpublish></propertygroup>
</project>
 "C:\Program Files\Microsoft Visual Studio\2019\Community\MSBuild\Current\Bin\MSBuild.exe" ".\DevOpsApplication.sln" /p:Configuration="Release" /t:Rebuild /t:Restore /p:DeployOnBuild=true /p:PublishProfile="DevOpsProfile" 


Option 2 - Without using a publish profile, define all the properties inline with MsBuild.exe

 "C:\Program Files\Microsoft Visual Studio\2022\Community\MSBuild\Current\Bin\MSBuild.exe" ^
	".\DevOpsApplication.sln" ^
	/t:Rebuild ^
	/t:Restore ^
	/p:Configuration=Release ^
	/p:DeployOnBuild=True ^
	/p:DeployDefaultTarget=WebPublish ^
	/p:WebPublishMethod=FileSystem ^
	/p:DeleteExistingFiles=True ^
	/p:PublishUrl="bin\Release"
Note: The first parameter is added as the solution name. So it will publish all the Web and Api projects which you have in the solution. 

Output folders

MVC Web Project Artifacts using MsBuild.exe

Api Project Artifacts using MsBuild.exe


Sunday, February 19, 2023

How to connect ASP.NET Core 6 API with React JS using Windows Authentication

 Recently I had to setup ReactJs application to support Windows Authentication with ASP.NET Core 6 API. Authorization will be handled via LDAP which is not included in this post.

I'm using axios as the http client to query API. Let's start creating a simple ReactJs Application.

Step 01 - Create React SPA.

npx create-react-app react-app-with-windows-auth
cd react-app-with-windows-auth
npm start

Refer Getting Started Guide for more information.

Step 02 - Setup axios

Axios is a promise-based HTTP Client for node.js and the browser. It is isomorphic (= it can run in the browser and nodejs with the same codebase). On the server-side it uses the native node.js http module, while on the client (browser) it uses XMLHttpRequests. Refer Getting Started for more information

npm install axios

Step 03 - Create ASP.NET Core 6 API Project

dotnet new webapi -o TodoApi
cd TodoApi

Step 04 - Add windows authentication to 6 API Project

in launchSettings.json file add following settings.

"iisSettings": {
    "windowsAuthentication": true,
    "anonymousAuthentication": false,
  }

Step 05 - Add CORS for Web Api Project

in Program.cs file add following settings.

using Microsoft.AspNetCore.Authentication.Negotiate;

var builder = WebApplication.CreateBuilder(new WebApplicationOptions
{
    Args = args,
    ContentRootPath = Directory.GetCurrentDirectory()
});

builder.Services.AddHttpContextAccessor();
builder.Services.AddCors(options =>
{
    options.AddDefaultPolicy(
        policy =>
        {
            policy
                    .WithOrigins("http://localhost:44426") // ReactApp Url
                    .AllowAnyHeader()
                    .AllowAnyMethod()
                    .AllowCredentials();
        });
});

// Add services to the container.

builder.Services.AddEndpointsApiExplorer();
builder.Services.AddSwaggerGen();

builder.Services.AddControllersWithViews();

builder.Services.AddAuthentication(NegotiateDefaults.AuthenticationScheme)
   .AddNegotiate();

builder.Services.AddAuthorization(options =>
{
    options.FallbackPolicy = options.DefaultPolicy;
});

var app = builder.Build();

// Configure the HTTP request pipeline.
if (app.Environment.IsDevelopment() || app.Environment.IsProduction())
{
    app.UseSwagger();
    app.UseSwaggerUI();
}

app.UseStaticFiles();
app.UseRouting();

app.UseCors();

app.UseAuthentication();
app.UseAuthorization();

app.MapControllerRoute(
    name: "default",
    pattern: "{controller}/{action=Index}/{id?}").RequireAuthorization();

app.MapFallbackToFile("index.html");

app.Run();

Step 06 - Add Axios settings

 async populateWeatherData() {

        try {
            const response = await axios.get('http://localhost:5000/weatherforecast/GetWeatherForecast', { withCredentials: true });
            console.log(response);
            this.setState({ forecasts: response.data, loading: false });
        } catch (error) {
            console.error(error);
        }
    }

Step 07 - Run both React App and Backend API

It will prompt small window to enter windows login and password when you try to access api endpoints. You can observe the same popup when you run swagger endpoint too

Step 08 - Working solution can be found in my git account

Wednesday, July 15, 2020

xUnit Tests Not Running in Visual Studio IDE

You may have encountered that Test projects are not running or not showing in the Test Explore pane in visual studio. I also have faced similar issue while creating a new xUnit Test Project for my application. Here are the changes I did to solve the issue. Once installed the following packages, I was able to run the tests in test explore as expected.

  • Microsoft.NET.Test.Sdk
  • Microsoft.TestPlatform.TestHost
  • xunit.runner.visualstudio
  • xunit

Monday, July 6, 2020

How to create an Excel WorkBook, Sheet in C#.NET

Recently, I had a requirement to export List to an Excel document separated by multiple sheets. I tried creating a .xlsx file using File.Create(filepath); approach which caused issues in writing into different sheets and workbook. So, I had to use interop library to get it done as follows. step 1: install interop nugget package to your solution
Microsoft.Office.Interop.Excel
step 2: Create a workbook and sheets
  
   var excel = new Microsoft.Office.Interop.Excel.Application(); 
   excel.Visible = false; 
   excel.DisplayAlerts = false; 
   var xlWorkBook = excel.Workbooks.Add(Type.Missing); 
   
   var xlSheets = xlWorkBook.Sheets as Microsoft.Office.Interop.Excel.Sheets;

   var worKsheeT =(Microsoft.Office.Interop.Excel.Worksheet)xlWorkBook.ActiveSheet; 
   worKsheeT.Name = "FirstSheet";
   
   var secondSheet = (Microsoft.Office.Interop.Excel.Worksheet)xlSheets.Add(
    Type.Missing,Type.Missing, Type.Missing, Type.Missing); 
   secondSheet.Name = "SecondSheet";
              
    xlWorkBook.SaveAs(filePath);
    xlWorkBook.Close(); 
    excel.Quit();


Sunday, July 5, 2020

How to KILL running excel processes in C#

While working with Excel files, you enconter multiple instance of excel processes are running in background(can be seen in Task Manger Processes). This will cause issues when trying to create and manupulate excel files in another program. Therefore, before working(reading/writing) with any excel objects, as a practice clean up the existing/running excel instances.
var processes = from p in Process.GetProcessesByName("EXCEL") select p;
            
foreach (var process in processes)
{
	process.Kill();
}

Thursday, June 13, 2019

Solved: Connect android emulator to the internet - AndroidWiFi

It is really common that you need to use emulator internet connection to access resources over the device connection during the mobile application development. But you may have faced an issue that device is not getting successful connection or use your PC/Laptop connection. So, in this article I'm going to show few steps to establish successful connection.

How can I connect my Android emulator to the internet, e.g. to use the browser?
 This is a common question you can see if you google. So let's digging to the solutions. 

1st Solution 

You may check for basic network connection issues like 
  • Allow apps through the Windows firewall(eg; Android Studio)
  • Disable the unused Network adapter
  • Disable third-party antivirus temporary.
  • Disable Proxy or VPN. 
  • Re-Install Android Studio and create new emulators. 

2nd Solution

Assuming your are on a wireless network and you have a LAN card installed. If so the issue could be that emulator tries to obtain its DNS settings from LAN settings but not via WiFi configurations. You can try few things:
  • Disable LAN adapter and all the other unused network adapters.
  • Connect to the WiFi connection in your Laptop and reboot the Android Emulator.
3rd Solution
Try to re-order the priority of the network connection to WiFi if you are not using LAN.

4th Solution

  • Go to the adapter settings 
  • Properties of IPv4
  • Change the DNS settings as shown below image.

Tuesday, June 4, 2019

Android project not found. Maybe run react-native android first?

You may encounter this "Android project not found. Maybe run react-native android first" error message when you try to deploy the react-native application to your mobile device. As far as I figured there are two things that you may have to do while doing a fix for this issue.

1. Straight forward solution.  
In most of the cases, this will sort out this error by upgrading the react-native package in the root folder.
  • Go to the Project Root.
  • Upgrade the React native package in the Command Prompt by typing :
        react-native upgrade
  • Then Accept to update all the Files by typing y (Yes) in the Command Prompt.
2. GIT based upgrade.
You might see another option saying to upgrade git related package as the following message:
"You should consider using the new upgrade tool based on Git. It makes upgrades easier by resolving most conflicts automatically."

  • Go back to the old version of React Native.
  • Run npm install -g react-native-git-upgrade
  • Run react-native-git-upgrade
See https://facebook.github.io/react-native/docs/upgrading.html
Your project needs to have a name, declared in package.json, such as "name": "AwesomeApp". Please add a project name. Aborting.